Text by Jørn Olav Løset, Norway.
Building a Viking ship or a boat of Norse design involves a traditional craftsmanship which is a refined art, delivered from master to apprentice, usually from father to son for generations. The skills vere passed on as tacit knowledge, mostly orally and by by practising the craft, usually without any detailed drawings or accurate diagrams. In additon, very often the crafter was himself an experienced seafarer, having participated in seasonal fisheries in the fjords and offshore from his early teens, giving him a first hand experience of what distinguished a good boat from a dangerous one. I have not yet built a wooden boat myself, but by visiting and knowing several boat builders I have a fair understanding of the main principles of how it has been and still is done in north-western Norway. This page is meant to explain some of the basic steps of norse wooden shipbuilding, and should not be regarded as a complete how-to guide as skill and experience is difficult to pass on in plain text.
Lapstrake - clinker boat building
The clinkered Viking ships stands in strong contast to the carvel method where strakes are fastened onto a skeleton of ribs. The Vikings applied a shell-first sequence, laying the keel first, then adding strakes and fitting the internal timbers as the last stage. A Viking ship is much lighter and more flexible than a carvel built ship of the same size, giving the Viking ship both excellent seaworthyness and making it capable of crossing shallow waters as rivers and allowing the crew to pull it ashore in a hurry.
The steps mentioned here is for smaller tradition boats as I have seen it, but the Viking ship were built in the same manner. The larger ships are reinforced in the stem and the stern in comparison to the smaller boats and the scale is, of course, much larger. This following description is roughly how clinker built boats have been made traditionally in Scandinavia. The earliest boats were sewn with animal guts, but were soon replaced with rivets as soon as iron gradually became accessible for the boat builders some 1700 years ago. The iron rivets are still called 'saum' in Norwegian dialects, literally meaning 'stitch', revealing an unbroken tradition of lapstrake building that reaches beyond the Iron age.
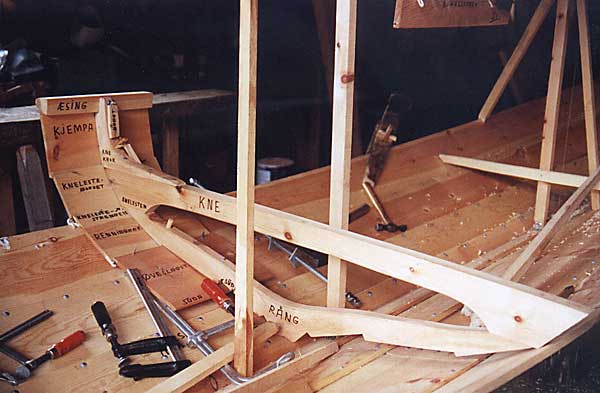
The lapstrake hull in detail with english and the names of the parts in Old Norse language.
This is a basic Viking boat.
Færing of the oselvar type with the keel, stern, stem and the two first strakes in correct position. Crafter is Hallgeir Bjørnevik from Os in Norway. More about the oselvar >>
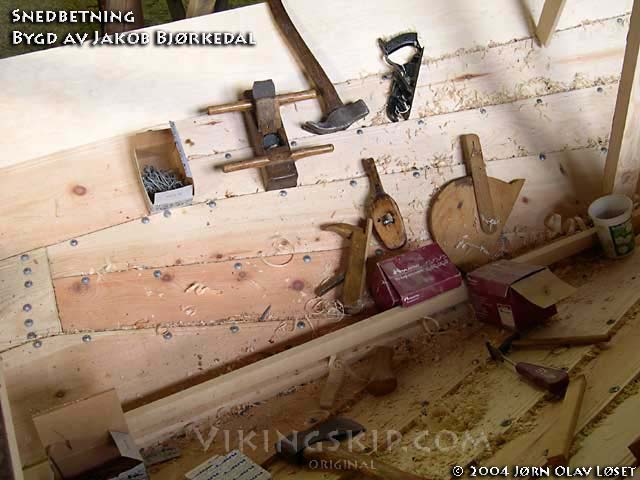
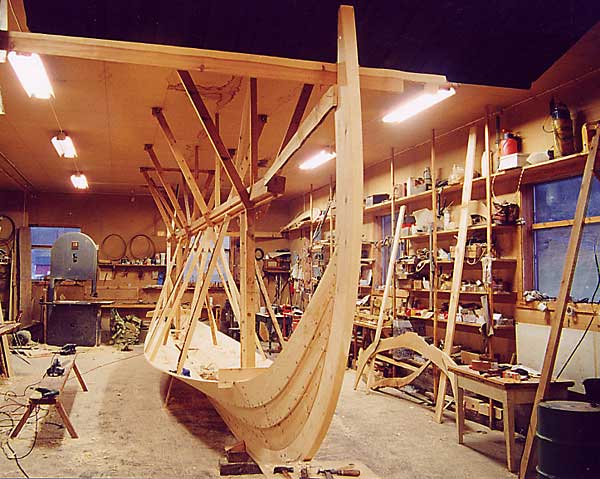
Arrangement for supporting the hull before the ribs are mounted. The boat is a færing from Sunnmøre during building. Crafter is Jakob S. Bjørkedal from Volda in Norway.
Every part of the hull have specific names, even each of the strakes.
This boat from Sunnmøre is unfinished for demonstration purpose.
Some of the hand tools used today in wooden boat building. A major difference from the viking age is the development of good saws and planes.
The Viking ship hull
The keel is cut and planed into its T- or Yshape and levelled onto temporary wooden blocks fastened to the floor in the workshop. The measures of the keel is of couse according to the chosen boat design. The keel must be cept firmly in position. It should be made from dry and 'dead' wood to prevent deformations during the construction, and, of course, be absolutely straight as seem from above. Some Viking ships, as the Oseberg ship, have a rockered keel, which means that the keel have to be fashioned into a curve before any strakes can be fitted. Many crafts also sported shallow false keels (on. 'drag') to protect the keel and bows from wear after repeated beachings. Attach the false keel now, if it was present originally.
Keel sections with T or Y -profile are always clinkered, while rebated sections are secured with long nails with roseheads (5" - 6" in larger ships).The stem and stern is fastened to the keel using wooden plugs or sturdy nails and roves, and adjusted into position using supporting rods attached to a rugged beam above the boat. Proof the overlapping surfaces with thick pine tar before final mounting. Any ornamentation of the stem and stern should be carved in advance, as well as giving the stem its final curvature. Stepped stems with 'wings' are particularly challenging to make. Building temporary scaffolds fore and aft can be necessary before the bow pieces can be fitted properly. Longships will normally require transition timbers between the keel and the bows; short keel extentions that were called 'undirluthr' in Old Norse.
The first two strakes are dressed (or sawn) and planed into shape and fastened to the keel at each side by iron clinkering through the T-profile of the keel, just as if the keel was a strake. Starting aft at the stern, each plank is temporarily fastened with clamps to adjust and fine tune the bevel along the top edge of the strake. Several adjustments and trials may have to be carried out until the plank can be permanently clinkered. The strake ends next to the stem and stern (the 'hals') are thinner (~ 50%) than the strakes amidships to make it easier to twist and bend them into the correct position. Stubborn strakes can be steamed to make them more flexible. Before final clinking, the edge of each strake must be proofed against leaks. Traditionally the caulking was done with animal hairs (usually from sheep or cows) or yarn proofed with tar, applied onto the lower inner edge (the land) of each successive strake.
The area of each strake which overlaps with the next strake, the land, is called "sud" (from old norse "suð"), a term which is inherited from the seamed joinery in the much earlier skinboats.
The nails are set from the outside and clinkered to their counterparts; the 'roves', on the inside. Drill pilot holes for the nails, and use a dolly in the inside while driving the nails through the strakes. Any excess length of the nail shaft is cut away and the rivet rounded by simultaneously hammering from each side, peening down the nail stub to a small lump which secures the rove.The following strakes are attached to each previous strake by overlapping about an inch, somewhat more in larger ships. The strakes are kept in position by supporting rods both before and after they are clinkered together. At this stage the hull is formed, 'laying out' the floor strakes in the bilge. The strakes are adjusted into position by supporting rods to the floor and to the beam above the boat (see illustration). The symmetry of each side has to be checked carefully, as any errors in shape are hard to correct later. On larger ships the sheer mass of the planks will make supporting rods on the upper side obsolete. When a new plank is finished on one side, it can be used as a template to mirror the corresponding strake on the opposite side. Sight along the edges of the subsequently fitted strakes to adjust for any bumps, cavities, hewing or fashioning the edge to ensure a smooth line before fitting the next strake.
A hole (ca 1") to drain the hull when the boat is pulled ashore should be made in one of the garboards. In particular, if you are building in the open, the hull will collect rain water which have to be evacuated also in the construction period. The hole is best placed somewhere aft of the mast close to the keel.
If you want to copy a successful hull design, interior templates can be used to adjust the positions of the strakes before fastening.
When most strakes have been clinkered, up to the 'meginhufr' ('the strong strake', see below), it is time to place the interior floortimbers and ribs in the hull. These should be made from naturally grown bent wood, as roots and branches. This gives them much greater strength and elasticity than if they were cut from straight logs. Designs from the 9th century may have lashed ribs below the waterline, while treenails with wedges are used to secure the ribs in designs from the 10th century and later. The wedges should be placed transversely on the inside of the rib, to prevent the rib from shattering. Apply tar proofing to the joing surfaces on both the ribs and the corresponding area of the strakes to prevent rotting. The foremost pair of rib tops can be extended into bollards on larger crafts as posts for mooring ropes.
If mast should be present, the keelson and mast block (mast 'fish') is mounted along with the ribs. On large ships were the keelson may be a heavy and long structure, it is wise to fit the keelson when about 50% of the planks are clinkered, and before the crossbeams (the 'bitis') are fitted.
After the ribs are fastened any remaining strakes are added and fastened to standing knees and futtocks that in turn rest on top of the crossbeams, secured with treenails. These upper strakes are never lashed, but secured with treenails, except for the top of the futtocks which are fastened with a rivet or a clenched nail. If oar holes are part of the design, make the oar holes with the oar blade slits before the strake is clinkered to the hull.
The gunwale is reinforced with inwale and/or outwale if this is part of the design.
Oarlocks are fastened along the gunwale, either with treenails or lashings (in older designs as Nydam). However, any craft have either oarlocks or oar ports exclusively, never a mix.
The floor tiles/deck planking (norwegian 'tiljer') are made for each 'room' (section) of the boat. The tiles are loose in smaller crafts.
The intermediate supporting rods can be removed.
The boat is treated with a mix of pine tar and turpentine for proofing. Soaked cloths with turpentine causes high risk of self-ingnition, so take care and dispose all soaked cloths safely. The boat must be treated several times 'wet-in-wet' both inside and outside. The thwarts should not be proofed.
The steering oar is made and mounted, with tiller. The rudder is secured with a sturdy withy willow or a hewser running through a rudder boss on the outside of the hull, and an adjustable band of skin, sometimes braided, at the gunwhale. The rudder willow is tied to the aft bulkhead. If the rudder is very large (tall, with a deep draught), this is better done after sea launch. Do this properly, as the rudder is a critical component. Make a spare rudder for longer voyages.
Mast, yard, sail, ropes, anchor and oars are made independently of the hull. The oars fore and aft can preferably be made a little bit longer than the oars amidships. Mark each oar with numbers or symbols (perhaps some cool runes?) to keep track of which side and rowing station the oar belongs to. S for starboard and P for port side (or B for the 'back board') is a good and intuitive system.
Sea launch and rigging
Time for sea launch! Large boats for salty waters must first be primed below the water-line to prevent fouling and wood gnarling worms and molluscs. Remember also to plug the draining hole. The traditional way to launch a Viking ship is to haul it to the water by pulling it over logs that rest on the ground. This operation requires well coordination. A large ship can be difficult to launch and the operation can be dangerous. Clear command lines is vital. Wait until the weather is favourable, with little crosswinds at the launching point, and the tide is high. An empty hull is light and catches wind easily. You don't want to ruin the boat now!
Expect the boat to leak a bit at first, sometimes a lot in the first couple of days. This is quite normal. But the hull will swell and the leak will decrease.
If the boat shall carry sail, it is now time to rise the mast and tie all ropes in the standing rig, as stays and shrouds, into position. Shrouds and stay(s) should be made adjustable with certain curved wooden levers that are used to attach the ropes to short slings of rope. Any blocks in the rig are usually made without pulleys (wheels). Far from all Viking ships will benefit from a backstay, as sagging and hogging will induce a very high strain on a backstay. The rope that carries the yard and the sail; the halyard, must be very strong!
Larger boats shall also have some ballast, consisting of stones with round edges. This is for safety reasons, because rounded stones easier will fall out of the hull of the ship capsizes. Exact ballasting is difficult to estimate, as it will vary with the number of crewmen and other cargo. A starting point is to ballast the craft to be level in calm water.
For safety reasons don't forget life jackets for all onboard and preferrably have another boat as escorte during the initial sailing trials. Inspect all ropes and knots and choose a day with modest winds for the first trials.
Hopefully the illustrations will ease your confusion a bit. Click images to enlarge:
Splitting logs into strakes.
The point is to avoid the marrow.Attaching the first strake to the keel
Keel support arrangement
Supporting the keel is absolutely essential to maintain symmetry in the keel when the strakes are added. Any errrors here can't be undone later. The diagram for splitting the logs into planks provides a challenge for boats builders who are forced to buy industrially sawn materials. Oak can be split radially, while pine permits tangentially split timbers, avoiding the pith in the center. Thus, it is possible to obtain wider planks of pine from a log of the same diameter.
Splitting or sawing the logs?
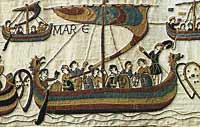
The shipbuilders in the Viking age (793 - 1066) used to split the logs by using axe and wedges along the centreline. The plank was then chopped into shape by using a broad adze, almost like it was a rough plane. This is illustrated in the Bayeux tapestry, and confirmed by investigating the strakes of archaelogical ship finds. From one log they usually only got two or four planks well suited for boat hull. This may look like a waist of resources to us, but the benefits are several:
In this way they achieved to get planks where the radial pores from the marrow (no: margstråle) where in parallell with the plank, instead of pentetrating the plank. The axe dressing and hand planing also made finer cuts in the cell structure in the surface and made the planks smoother and more water resistant than saw planks. A third advantage was that the growth rings in the wood then got right-angled to the surface. Each strake then became stronger and more resistant to mechanical wear. The result was a stronger hull more resistant to leaks and wear.
A guess from my side is that it is possible that the root end of each strake was deliberately placed towards the front end ot the ship. Then the wood fibres in the strake and the surface chop marks would reject the water flow, instead of leading water into the wood cells. Adzing against the wood fibres is difficult, but along it is easy. The root end is also stronger and more rigid than the top end and provides a better nail grip. This principle has been used in norse wooden skis for centuries and to some extent in wooden roof covering in Norway. It may very well have its parallell in norse shipbuilding. Much of this understanding of the mechanical properties in wood is lost with the introduction of modern saw mills.For most ship builders of today a viking ship project is a compromise between financial resources and to which extent one can follow the historic building techniques. In most projects the builder is restricted to selecting industrially sawed planks instead of splitting and adzing logs. This was the case for famous replicas like Saga Siglar and Gaia and others, even though the ship builders were well aware of the log splitting technique.
But despite shortage of time and money the above principles can still be used to some degree. One should try to select planks at the store which are sawn in a similar pattern along the core-line. Choose planks with dense growth rings and few knots. The weaker pith itself should be avoided and planed away, first by machine but preferably finished by hand planing. Hence, if you have sawn planks, the quality can be improved by later planing with edged hand tools.
Strake joints, or scarfs as the Vikings would have said
Keel and stern scarfs
4,6 or more rivets may be needed in larger vesselsPlank box for steaming strakes
A steamed plank must be fitted before it cools.The strakes and the keel joints are done by slanting the overlapping ends. The nails then penetrate both ends, forming a strong joint. Remember the direction of the water when the boat is in use so water is not forced into the hull by the movement the boat. Such joints should ideally be avoided or at least be spread evenly along the hull. Two joints in two successive strakes must never be placed at the same rib. This will substantially weaken the hull at this point.
Warning! The same goes for the keel if this is laminated. The Gokstad replica Ormen Friske built in 1949 had a laminated keel where the joints of each layer in the laminat were put way too close to the other joints, instead of being spread evenly along the keel. The result was a weak point in the keel close to the mast basis which turned out deadly when Ormen Friske hit a storm offshore in 1950. The ship broke apart and none of the 15 crewmen survived. The lesson is as simple as challenging: do not take any short cuts in the design and be critical when selecting the materials.
Stiff planks can easier be bent into shape after steaming. Steaming can be done easily by an arrangement of boiling water in an oil barrel, leading the steam through a pipe into a hollow profile of planks. If possible the hull should be built of "green" timber fresh from the saw mill or kept moist until builiding is done.
In some parts of western Norway the former boat builders used to soak the strakes or timer in salty water in the fjord. When sunk as deep as 200 m for a month or two the wood got penetrated by the salt in the cold water. When the wood later dried, the salt was left within as a natural proofing against rotting.'Meginhufr' - 'the Strong Strake' in Viking ships
One of the strakes deserves to be mentioned in particular. Many of the excavated Viking ships feature a special design of the strake which is level with or just below the crossbeams, the so called 'meginhufr'. The name is Old Norse language, a compound of 'megin' and 'hufr', the first meaning 'large' or strong and the latter 'strake' or ship plank. Thus, the 'meginhufr' is the strong or sturdy strake, a construction element that absorbs and distribute the lateral forces from the waves and the crossbeams and at the same time makes up a longitudinal reinforcement that acts like a spring along the ship side, maintaining the flexibility of the hull. The meginhufr is thicker than the other strakes (about 50%), slightly narrower and often hewed into a rather intricate profile, like an L or an S with distinct edges. It is also made from a very long timber, 2 - 3 times longer, compared to standard strakes, as the ship builders have tried to make it as long as possible in one piece.
The meginhufr is often seen in the early Viking ships, those with lashed ribs, and rarely in ships that dates to the 11th century or later. In later ships it has been replaced with long stringers, that are attached to the inside of a more ordinary strake. Obviously a simpler solution for the crafter, requiring less specialized skills and saves some of the raw materials, but possibly also resulting in a weaker hull. The meginhufr is often found in one of the plank tier from 7 to 12 counted from the keel, depending on the size of the vessel. In the Oseberg ship the meginhufr is the 10th strake, running some 13 m long without scarfs. Anyone who replicates a Viking ship after an actual design that originally had this special strake (on both sides), should try to replicate it as good as possible as it is a significant element in the hull.The rig and square sail
The rig of a viking knarr.
(Click to enlarge)Phoenician merchant ship with similar rig, ca 1000 BC.
Image University of Texas, permission pending.The Bayeux Tapestry
Nordfjord færing 19th century.
One mast and a square sail
The viking ship had only one mast which could be taken down. The sail was square attached to a cross beam in top. In addtion the mast was supported by ropes from the top down to the stern and stem and to several places along the gunwhale. The crossbeam could pivot around the mast so that the ship could be sailed with wind from behind and from both sides. The main problem was to sail against the wind. It was possible to some degree, but could not sail as sharp as with a modern rig.
The sail was made of woven wool or linen. The ropes were usually tar-proofed hemp. In more rare cases ropes were made from horse tails or even from walrus hide.Phoenician inspired rig?
I believe that the scandinavians were strongly influenced by mediterranean rig designs when they started to put mast and sail on their ships. The transition from pure rowing ships to sailing ships probably took place in the 6h and 7th century.
The Phoenicians used rig designs with one mast and a sqare sail some 2000 years earlier. Although the Phoenicians eventually disappeared, their rig design survived in Greek and Roman ship designs. Somehow the ideas of such rigs must have travelled to northern Europe. The Romans used sailing crafts when they expanded the Roman empire to include parts of England and travelled the large rivers in Central Europe. Roman coins have also been found as far north as Herjolfsey in Iceland, which may indicate that the Romans undertook long voages deep into Scandinavia long before the Viking age. But the Scandinavian ships remained largely rowing ships until the keel was strong enough to carry the strain from a sail between the 5th and 7th century. Perhaps the upright keel was developed in direct response to just meet these demands? The further development of the keel, mast base and rig then must have followed hand in hand.Carved picture stones from the 8th century from Gotland in Sweden shows several varieties of ships with rig. The height-width ratio of the sail should probably not be regarded as accurate in these images as they are very rough in design and limitated to the shape of the stone. But they all confirm the sqare shape of the sail. Some of these images also picture a lower yard in the bottom of the sail.
The ships in the Bayeux tapestry do not have these lower yards. Instead they show problems with the sail collapsing in its lower part. These ships were built in Normandy by William the Conquerer, and may not be good examples of a viking rig design or the embroidery may be inaccurate in displaying correct rigs.
This indicates that several rig designs existed side by side. Most (or all?) modern viking ship replicas have left out a lower yard, but sometimes include a lower beam for keeping the sail wide at the foremost lower corner while tacking or sailing downwind in modest winds.The rig of the Gokstad ship
A major problem for maritime researchers and historians is that a viking ship with a complete rig has never been found. Some remains of ropes and parts of a sail was found in the Gokstad ship. The mast was cut or broken and some wooden beams belonging to the rig was found. But still the rig was incomplete, so one is left to some guessing to get the entire picture. The size of the sail and heigth of the mast is widely discussed ever since the Gokstad ship was excavated.
The 1892 replica Viking had a square sail, but this was probably too tall. Later replicas have been equipped with a lower and broader sail. An old norwegian rule of thumb says that one should be able to lower the mast within the stern of the ship. In the case of the 24 m long Gokstad ship this limits the height to about 12 m.
Later wooden boats from western and northern Norway are direct descendants of the viking ships, and are likely to have rigs and sails very much like the Vikings used.
The sail and rig designs were usually slightly different in each geographich area and of course in size according to the size of the boat. But the square forms (quadratic, trapezioid or rectangular) were dominant into the latter part of the 19th century. Boats from western Norway usually had lower sails than in northern Norway, and some with trapeziod sails.From about 1880 triangular sails took over as the main design. This also changed the way the norse wooden boats could be sailed, and in many ways the sailing tradition of the vikings was broken.These are the key elements in norse shipbuilding as I see them, told in brief. Before you eventually go ahead building a boat, seek as much information as you can. Study finished boats in detail and listen to people who have done this before you (thus.. not me!). Take care selecting only good materials. Oak is what the vikings preferred, but pine is also fine. In northern parts of Norway spruce was used, as the climate there is to cold for growing pine in suitable dimensions. The sail can be sewn from Duradon if you are building on a budget, as most builders do. A sail of woven wool is historically much more correct, but will also rise the cost of a project by one half or even more.
For further inspiration, see the rest of this site.
Regards from Jørn Olav Løset